wForget's blog


  • Home

  • About

  • Tags

  • Archives

Gremlin Server/Console 适配 Atlas JanusGraph

Posted on 2020-12-14

Gremlin Server/Console 适配 Atlas JanusGraph

Atlas 底层存储使用的 JanusGraph,由于对于 Atlas 底层数据结构并不太清楚,所以希望能够通过 Gremlin Console 来操作 Atlas 的 JanusGraph,使用 Gremlin Query Language 执行一些更加灵活的查询,并直观的查询数据结构。适配的思路参考了 docker-apache-atlas 项目。

Gremlin Server

  1. 下载相同版本的 gremlin server ,解压,并添加 Atlas 相关的依赖包
1
2
3
4
5
6
ATLAS_HOME=/home/anchor/apache-atlas-2.1.0/
GREMLIN_SERVER_HOME=/home/anchor/gremlin/apache-tinkerpop-gremlin-server-3.4.6
ln -s ${ATLAS_HOME}/server/webapp/atlas/WEB-INF/lib/*.jar ${GREMLIN_SERVER_HOME}/lib 2>/dev/null
rm -f ${GREMLIN_SERVER_HOME}/lib/atlas-webapp-2.1.0.jar
rm -f ${GREMLIN_SERVER_HOME}/lib/netty-3.10.5.Final.jar
rm -f ${GREMLIN_SERVER_HOME}/lib/netty-all-4.0.52.Final.jar
  1. gremlin server 配置

gremlin-server-atlas-wshttp.yaml 配置

1
2
3
4
5
6
7
8
9
10
11
12
13
14
15
16
17
18
19
20
21
22
23
24
25
26
27
28
29
30
31
32
33
34
35
36
37
38
39
40
41
42
43
44
45
46
host: 0.0.0.0
port: 8182
scriptEvaluationTimeout: 30000
#channelizer: org.apache.tinkerpop.gremlin.server.channel.WebSocketChannelizer
channelizer: org.apache.tinkerpop.gremlin.server.channel.WsAndHttpChannelizer
graphs: {
graph: conf/janusgraph-hbase-es.properties
}
scriptEngines: {
gremlin-groovy: {
plugins: { org.apache.tinkerpop.gremlin.server.jsr223.GremlinServerGremlinPlugin: {},
org.apache.tinkerpop.gremlin.tinkergraph.jsr223.TinkerGraphGremlinPlugin: {},
org.apache.tinkerpop.gremlin.jsr223.ImportGremlinPlugin: {classImports: [java.lang.Math], methodImports: [java.lang.Math#*]},
org.apache.tinkerpop.gremlin.jsr223.ScriptFileGremlinPlugin: {files: [scripts/empty-sample.groovy]}}}}
# JanusGraph sets default serializers. You need to uncomment the following lines, if you require any custom serializers.
#
# serializers:
# - { className: org.apache.tinkerpop.gremlin.driver.ser.GraphBinaryMessageSerializerV1, config: { ioRegistries: [org.janusgraph.graphdb.tinkerpop.JanusGraphIoRegistry] }}
# - { className: org.apache.tinkerpop.gremlin.driver.ser.GraphBinaryMessageSerializerV1, config: { serializeResultToString: true }}
# - { className: org.apache.tinkerpop.gremlin.driver.ser.GryoMessageSerializerV3d0, config: { ioRegistries: [org.janusgraph.graphdb.tinkerpop.JanusGraphIoRegistry] }}
# - { className: org.apache.tinkerpop.gremlin.driver.ser.GryoMessageSerializerV3d0, config: { serializeResultToString: true }}
# - { className: org.apache.tinkerpop.gremlin.driver.ser.GraphSONMessageSerializerV3d0, config: { ioRegistries: [org.janusgraph.graphdb.tinkerpop.JanusGraphIoRegistry] }}
# # Older serialization versions for backwards compatibility:
# - { className: org.apache.tinkerpop.gremlin.driver.ser.GryoMessageSerializerV1d0, config: { ioRegistries: [org.janusgraph.graphdb.tinkerpop.JanusGraphIoRegistry] }}
# - { className: org.apache.tinkerpop.gremlin.driver.ser.GryoLiteMessageSerializerV1d0, config: {ioRegistries: [org.janusgraph.graphdb.tinkerpop.JanusGraphIoRegistry] }}
# - { className: org.apache.tinkerpop.gremlin.driver.ser.GryoMessageSerializerV1d0, config: { serializeResultToString: true }}
# - { className: org.apache.tinkerpop.gremlin.driver.ser.GraphSONMessageSerializerV2d0, config: { ioRegistries: [org.janusgraph.graphdb.tinkerpop.JanusGraphIoRegistry] }}
# - { className: org.apache.tinkerpop.gremlin.driver.ser.GraphSONMessageSerializerGremlinV1d0, config: { ioRegistries: [org.janusgraph.graphdb.tinkerpop.JanusGraphIoRegistryV1d0] }}
# - { className: org.apache.tinkerpop.gremlin.driver.ser.GraphSONMessageSerializerV1d0, config: { ioRegistries: [org.janusgraph.graphdb.tinkerpop.JanusGraphIoRegistryV1d0] }}
processors:
- { className: org.apache.tinkerpop.gremlin.server.op.session.SessionOpProcessor, config: { sessionTimeout: 28800000 }}
- { className: org.apache.tinkerpop.gremlin.server.op.traversal.TraversalOpProcessor, config: { cacheExpirationTime: 600000, cacheMaxSize: 1000 }}
metrics: {
consoleReporter: {enabled: true, interval: 180000},
csvReporter: {enabled: true, interval: 180000, fileName: /tmp/gremlin-server-metrics.csv},
jmxReporter: {enabled: true},
slf4jReporter: {enabled: true, interval: 180000},
graphiteReporter: {enabled: false, interval: 180000}}
maxInitialLineLength: 4096
maxHeaderSize: 8192
maxChunkSize: 8192
maxContentLength: 65536
maxAccumulationBufferComponents: 1024
resultIterationBatchSize: 64
writeBufferLowWaterMark: 32768
writeBufferHighWaterMark: 65536

janusgraph-hbase-es.properties 配置

1
2
3
4
5
6
7
8
9
10
11
12
13
gremlin.graph=org.janusgraph.core.JanusGraphFactory
storage.backend=hbase
storage.hostname=127.0.0.1:2181
cache.db-cache = true
cache.db-cache-clean-wait = 20
cache.db-cache-time = 180000
cache.db-cache-size = 0.5
storage.hbase.table=apache_atlas_janus
storage.hbase.ext.hbase.security.authentication=kerberos
storage.hbase.ext.hbase.security.authorization=true

index.search.backend=elasticsearch
index.search.hostname=127.0.0.1:9200

将 HBASE_CONF_DIR 加入 gramlin-server classpath 中(避免 kerberos 认证,连接失败等问题)

1
2
# vim gremlin-server.sh
CP="$GREMLIN_HOME/conf/:$HBASE_CONF_DIR"
  1. 启动 gramlin server
1
nohup bin/gremlin-server.sh conf/gremlin-server-atlas-wshttp.yaml > gramlin-server.log 2>&1 &

Gremlin Console

  1. 下载并解压 gremlin console ,启动
1
bin/gremlin.sh
  1. 连接 gremlin server
1
2
:remote connect tinkerpop.server conf/remote.yaml session
:remote console

Gremlin Console 操作

查询一个 hive_table 节点

1
2
3
// hive_table where qualifiedName = "aaa.test@test"
g = graph.traversal()
g.V().has("__typeName", "hive_table").has("Referenceable.qualifiedName", "aaa.test@test").values()

查看 Graph 的一些信息

1
2
3
4
5
6
7
8
9
10
mgmt = graph.openManagement()

mgmt.printVertexLabels() // 打印 VertexLabels 信息
mgmt.printEdgeLabels() // 打印 EdgeLabels 信息
mgmt.printPropertyKeys() // 打印 PropertyKeys 信息
mgmt.printIndexes() // 打印所有索引信息

mgmt.printSchema() // 打印 Schema,包括上面的所有信息

index = mgmt.getGraphIndex("vertex_index"); // 获取索引对象

查询 Patch 节点信息

1
2
3
g.V().has("patch.type", "TYPEDEF_PATCH")

g.V().has("patch.type", "JAVA_PATCH")

Graphexp 安装

Graphexp 是一个前端项目,结合 gremlin server 提供图数据的可视化。项目地址:https://github.com/bricaud/graphexp

拉取 github 代码,安装 Nginx 并进行如下配置。完成后访问:http://localhost:9990/graphexp.html

1
2
3
4
5
6
7
8
# vim /etc/nginx/conf.d/graphexp-9990.conf
server {
keepalive_requests 120; #单连接请求上限次数。
listen 9990; #监听端口
location ~*^.+$ { #请求的url过滤,正则匹配,~为区分大小写,~*为不区分大小写。
root /data/nginx/graphexp; #插件目录
}
}

其他问题

  1. Max frame length of 65536 has been exceeded.
1
2
3
# io.netty.handler.codec.http.websocketx.CorruptedWebSocketFrameException: Max frame length of 65536 has been exceeded.
# vim conf/remote.yaml
connectionPool: {maxContentLength: 655360}

Linkis 新引擎实现分享

Posted on 2020-11-01

Linkis 新引擎实现分享

在社区大佬的帮助下,我们完成了 0.11 版本的开发,实现了 ElasticSearch 和 Presto 引擎。具体的开发文档可以参考: Linkis引擎开发文档

执行引擎架构的选择

目前 Linkis 的架构可以分为两种,一种是 Entrance-EngineManger-Engine 的模式,一种是 Entrance 模式。统一执行服务的架构可以参考官方文档: Linkis-UJES设计文档

Entrance 服务作为执行的入口,主要负责任务的持久化工作,日志的输出,进行脚本的校验和变量替换,并与 Engine、EngineManager 服务交互,向可用的 Engine 发送执行任务的请求,或者向 EngineManager 发送启动 Engine 的请求。

EngineManager 服务主要负责 Engine 的启动,进行 Engine 请求资源的请求与释放,并持续监控 Engine 的状态。

Engine 服务负责任务的具体执行,包括了任务执行的一些初始化操作、任务脚本的切分、任务的执行、任务的进度监控和结果集的保存等工作。

Spark、Hive 引擎是 Entrance-EngineManger-Engine 模式实现,在这个模式中 Engine 作为 Spark 、Hive 任务的 Driver 端,向外暴露接口可持续的接受 Entrance 发来的请求,完成任务的执行。这个模式中不仅实现了多租户的任务隔离,还提供了单用户的引擎复用,尽量减少 Engine 的启动,大大提高了执行的效率。

上面的各个服务可以看到每个服务的职责非常的明确,不过多个服务也让整个的架构变的比较重,有一些轻量的执行没有必要通过 Entrance-EngineManger-Engine 模式进行实现。例如 Linkis JDBC 引擎的实现就是通过 Entrance 的模式。JDBC 引擎的职责就是作为 JDBC 连接的客户端向服务端发送请求,并进行连接的维护。JDBC 连接的维护是比较轻量级的,而且 JDBC 连接的复用也不是根据平台用户进行区分的,所以单独为每个用户启动一个引擎是没有必要的。

ElasticSearch 和 Presto 的客户端实际上就是 Http Client,所以 ElasticSearch 和 Presto 引擎的实现也应该是比较轻量的,最终我们实现的 ElasticSearch 和 Presto 引擎也是通过 Entrance 的模式实现的。

引擎资源控制

Linkis 的资源管理服务,用来管理用户、系统的资源和并发的控制,实现新的引擎需要考虑到引擎资源相关接口的实现。具体架构可参考:Linkis RM设计文档

Entrance-EngineManger-Engine 模式资源控制

Entrance-EngineManger-Engine 的模式,资源相关主要需要下面两个实现:

  1. EngineManger 注册资源
    Linkis RM设计文档中可以看到,EngineManger 作为 Engine 资源的管理者,需要先向 ResourceManger 进行管理资源的注册。
    Linkis 已经将 EngineManger 注册资源的逻辑进行了抽象,实现的时候只需要在 SpringConfiguration 中进行配置创建 resources 的 spring bean 对象,可以参考 SparkEngineManagerSpringConfiguration 的实现。
1
2
3
4
5
6
7
8
9
10
11
12
13
14
15
16
17
18
19
20
21
22
23
// com.webank.wedatasphere.linkis.enginemanager.configuration.SparkEngineManagerSpringConfiguration

@Configuration
class SparkEngineManagerSpringConfiguration {

@Bean(Array("resources"))
def createResource(): ModuleInfo = {
val totalResource = new DriverAndYarnResource(
new LoadInstanceResource(ENGINE_MANAGER_MAX_MEMORY_AVAILABLE.getValue.toLong,
ENGINE_MANAGER_MAX_CORES_AVAILABLE.getValue, ENGINE_MANAGER_MAX_CREATE_INSTANCES.getValue),
null
)

val protectedResource = new DriverAndYarnResource(
new LoadInstanceResource(ENGINE_MANAGER_PROTECTED_MEMORY.getValue.toLong, ENGINE_MANAGER_PROTECTED_CORES.getValue,
ENGINE_MANAGER_PROTECTED_INSTANCES.getValue),
null
)

ModuleInfo(Sender.getThisServiceInstance, totalResource, protectedResource, ResourceRequestPolicy.DriverAndYarn)
}
// ...
}
  1. EngineResourceFactory 实现
    EngineManager 创建 Engine 的时候需要先向 ResourceManger 去请求资源,所以新引擎需要提供 EngineResourceFactory 的实现,用来初始化创新 Engine 所需要的资源,再向 ResourceManger 进行请求。
    Linkis 中提供了 AbstractEngineResourceFactory 的抽象,实现的时候只需要从 AbstractEngineResourceFactory 继承。具体可参考 SparkEngineResourceFactory 的实现:
1
2
3
4
5
6
7
8
9
10
11
12
13
14
15
16
17
18
// com.webank.wedatasphere.linkis.enginemanager.configuration.SparkEngineResourceFactory

@Component("engineResourceFactory")
class SparkEngineResourceFactory extends AbstractEngineResourceFactory {

override protected def getRequestResource(properties: java.util.Map[String, String]): DriverAndYarnResource = {
val executorNum = DWC_SPARK_EXECUTOR_INSTANCES.getValue(properties)
new DriverAndYarnResource(
new LoadInstanceResource(ByteTimeUtils.byteStringAsBytes(DWC_SPARK_DRIVER_MEMORY.getValue(properties) + "G"),
DWC_SPARK_DRIVER_CORES,
1),
new YarnResource(ByteTimeUtils.byteStringAsBytes(DWC_SPARK_EXECUTOR_MEMORY.getValue(properties) * executorNum + "G"),
DWC_SPARK_EXECUTOR_CORES.getValue(properties) * executorNum,
0,
DWC_QUEUE_NAME.getValue(properties))
)
}
}

Entrance 模式并发控制

Lnkis 中将 Engine 的实例数作为资源的一种,目前用户请求的并发是通过 Engine 的实例数进行控制的,那么在 Entrance 的模式下,就没有很好的对用户的并发进行控制。

在 ElasticSearch 和 Presto 的实现中,我们参考了 EngineManager 的资源控制,将并发数作为资源的一种,在 Entrance 启动时进行模块资源注册。将每个执行作为一个实例,执行发生时先进行资源的请求和锁定,执行完成后进行资源的释放,从而达到用户并发的控制。

主要包括了以下步骤:

  1. Entrance 注册并发资源
    Entrance 注册并发资源,需要创建资源实例,将并发作为资源的一部分,然后配合 @EnableResourceManager 和 @RegisterResource 注解进行资源注册。
1
2
3
4
5
6
7
8
9
10
11
12
13
// 定义资源
@Bean(Array("resources"))
def createResource(): ModuleInfo = {
// 创建并发资源实例,分为总资源和受保护的资源
val totalResource = new InstanceResource(EsEntranceConfiguration.ENTRANCE_MAX_JOB_INSTANCE.getValue)
val protectResource = new InstanceResource(EsEntranceConfiguration.ENTRANCE_PROTECTED_JOB_INSTANCE.getValue)
info(s"create resource for es engine totalResource is $totalResource, protectResource is $protectResource")
ModuleInfo(Sender.getThisServiceInstance, totalResource, protectResource, ResourceRequestPolicy.Instance)
}

// 注册资源
@RegisterResource
def registerResources(): ModuleInfo = resources
  1. 执行前请求锁定资源
    执行实例初始化前,先通过 ResourceManagerClient#requestResource 方法请求锁定并发实例资源。
1
2
3
4
5
6
7
8
9
10
11
rmClient.requestResource(requestEngine.user, requestEngine.creator, new InstanceResource(1)) match {
case NotEnoughResource(reason) =>
// 没有请求到资源,抛出异常
throw EsEngineException(LogUtils.generateWarn(reason))
case AvailableResource(ticketId) => {
// 请求到资源,创建执行实例,并保存 ticketId 用于释放资源
// ...
// 当资源被实例化后,返回实际占用的资源总量
rmClient.resourceInited(UserResultResource(ticketId, requestEngine.user), new InstanceResource(1))
}
}
  1. 执行完成释放资源
    执行完成后销毁执行实例,并通过 ResourceManagerClient#resourceReleased 方法释放锁定的资源。
1
2
// 使用 ticketId 释放对应的资源
rmClient.resourceReleased(UserResultResource(ticketId, requestEngine.user))

ElasticSearch 引擎的实现

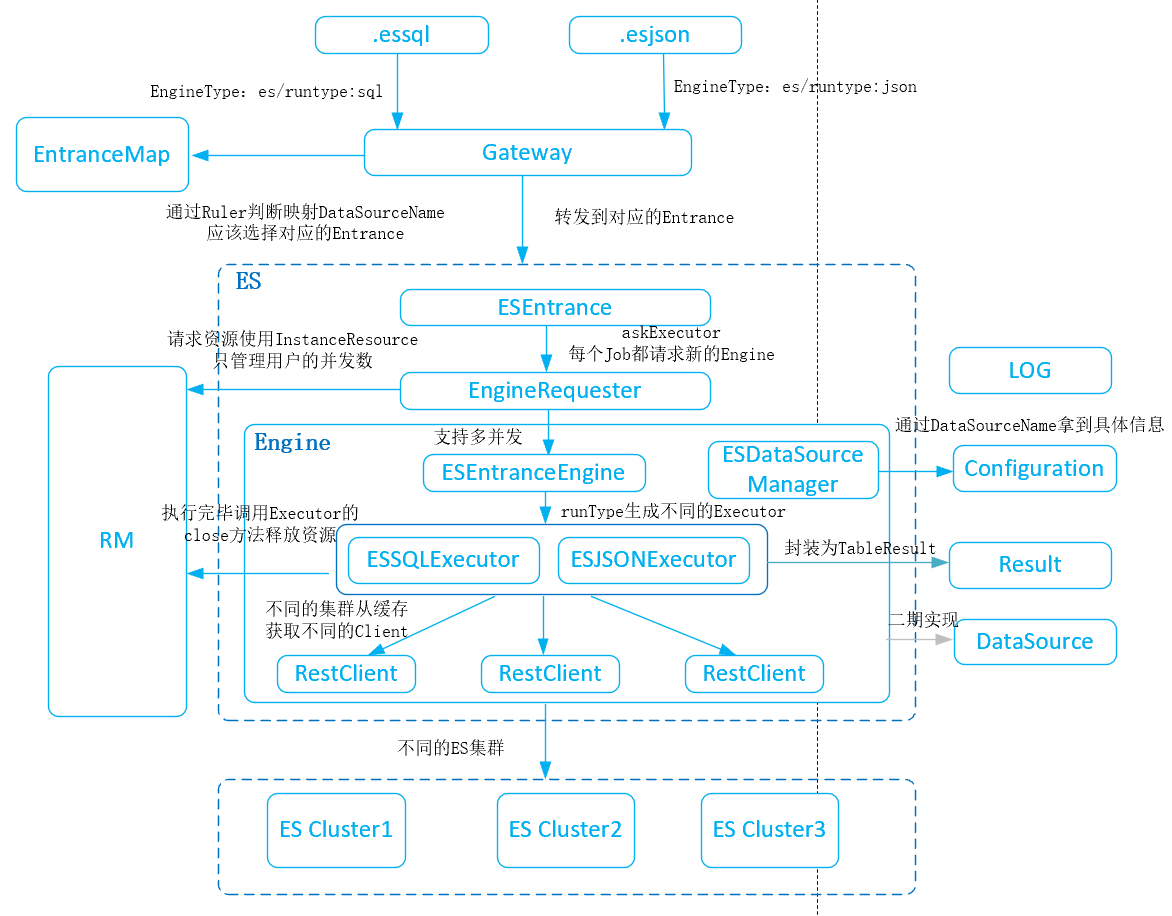
下面是微众王和平大佬帮忙画的 ElasticSearch 引擎整体的架构图:

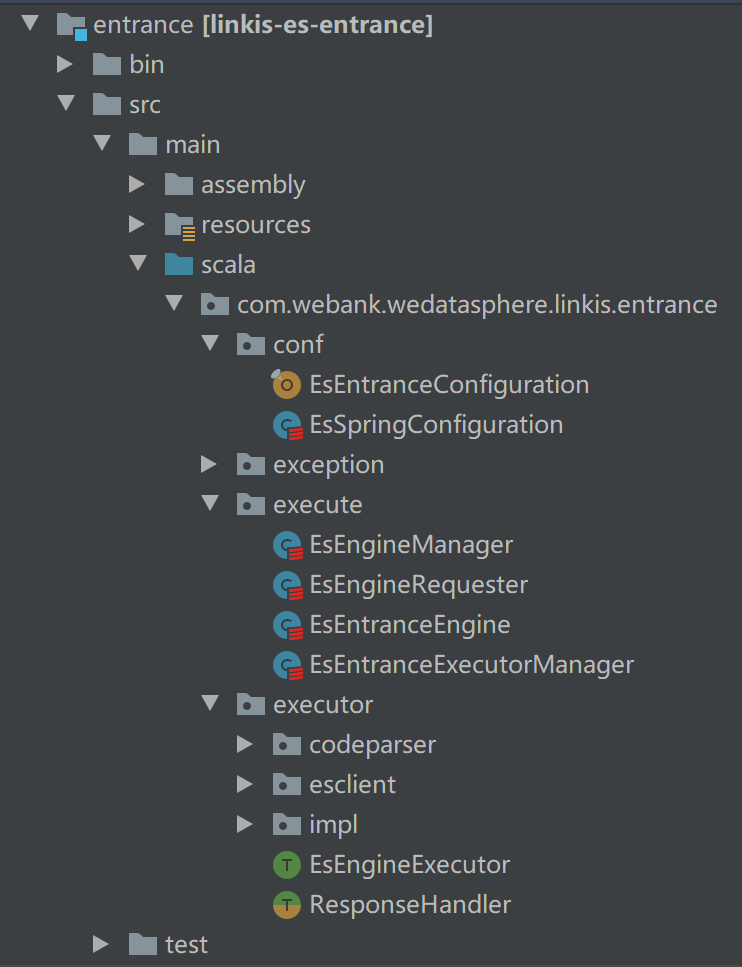
Linkis 新引擎的实现还是比较容易的,ElasticSearch 引擎的代码结构如下,整体的代码量也是比较少。主要包括了资源的配置、执行器的实例化和ElasticSearch请求与结果解析的相关代码。

  1. 资源注册
    ElasticSearch 引擎需要考虑到用户请求的并发和 Entrance 整体并发的控制。
    Entrance 启动时,需要对 Entrance 可用资源进行注册,主要包括了最大实例数和保护的阈值。在 EsSpringConfiguration 中生成资源的 bean 对象,并传入 EsEngineManager 进行注册,配置 @EnableResourceManager 和 @RegisterResource 就会自动进行注册。
1
2
3
4
5
6
7
8
9
10
11
12
13
14
15
16
17
18
19
20
21
22
23
24
25
26
27
// com.webank.wedatasphere.linkis.entrance.conf.EsSpringConfiguration
class EsSpringConfiguration extends Logging{

@Bean(Array("resources"))
def createResource(@Autowired rmClient: ResourceManagerClient): ModuleInfo = {
// Clean up resources before creating resources to prevent dirty data when exiting abnormally (创造资源之前进行资源清理,防止异常退出时产生了脏数据)
Utils.tryQuietly(rmClient.unregister())
Utils.addShutdownHook({
info("rmClient shutdown, unregister resource...")
rmClient.unregister
})
val totalResource = new InstanceResource(EsEntranceConfiguration.ENTRANCE_MAX_JOB_INSTANCE.getValue)
val protectResource = new InstanceResource(EsEntranceConfiguration.ENTRANCE_PROTECTED_JOB_INSTANCE.getValue)
info(s"create resource for es engine totalResource is $totalResource, protectResource is $protectResource")
ModuleInfo(Sender.getThisServiceInstance, totalResource, protectResource, ResourceRequestPolicy.Instance)
}

}

// com.webank.wedatasphere.linkis.entrance.execute.EsEngineManager
@EnableResourceManager
class EsEngineManager(resources: ModuleInfo) extends EngineManager with Logging {

@RegisterResource
def registerResources(): ModuleInfo = resources

}
  1. 请求执行器
    EsEngineRequester 启动一个执行器,用于任务的执行,通过 request 方法对传入的 job 生成一个执行的 EsEntranceEngine,请求时先向 ResourceManager 请求并锁定一个实例的资源,在 EsEntranceEngine 执行结束后会进行释放。
1
2
3
4
5
6
7
8
9
10
11
12
13
14
15
16
17
18
19
20
21
22
23
24
25
26
27
28
29
30
31
32
33
34
35
36
37
// com.webank.wedatasphere.linkis.entrance.execute.EsEngineRequester
class EsEngineRequester(groupFactory: GroupFactory, rmClient: ResourceManagerClient) extends EngineRequester {
override def request(job: Job): Option[EntranceEngine] = job match {
case entranceJob: EntranceJob => {
val requestEngine = createRequestEngine(job);
// request resource manager
rmClient.requestResource(requestEngine.user, requestEngine.creator, new InstanceResource(1)) match {
case NotEnoughResource(reason) =>
throw EsEngineException(LogUtils.generateWarn(reason))
case AvailableResource(ticketId) => {
val engine = new EsEntranceEngine(idGenerator.incrementAndGet(), new util.HashMap[String, String](requestEngine.properties)
, () => {rmClient.resourceReleased(UserResultResource(ticketId, requestEngine.user))})
engine.setGroup(groupFactory.getOrCreateGroup(getGroupName(requestEngine.creator, requestEngine.user)))
engine.setUser(requestEngine.user)
engine.setCreator(requestEngine.creator)
// engine.updateState(ExecutorState.Starting, ExecutorState.Idle, null, null)
engine.setJob(entranceJob)
engine.init()
executorListener.foreach(_.onExecutorCreated(engine))
rmClient.resourceInited(UserResultResource(ticketId, requestEngine.user), new InstanceResource(1))
Option(engine)
}
}
}
case _ => None
}
}
// com.webank.wedatasphere.linkis.entrance.execute.EsEntranceEngine
class EsEntranceEngine(id: Long, properties: JMap[String, String], resourceRelease: () => Unit) extends EntranceEngine(id) with SingleTaskOperateSupport with SingleTaskInfoSupport {
override def close(): Unit = {
try {
this.job.setResultSize(0)
this.engineExecutor.close
// 释放资源
resourceRelease()
// ......
}
  1. 任务执行
    EsEntranceEngine 是 com.webank.wedatasphere.linkis.entrance.execute.EntranceEngine 的实现,进行脚本的执行。在这里抽出一层 EsEngineExecutor 作为 Es 任务的具体执行。EsEntranceEngine 则负责 EsEngineExecutor 的初始化、脚本解析切分等实现。
1
2
3
4
5
6
7
class EsEntranceEngine(id: Long, properties: JMap[String, String], resourceRelease: () => Unit) extends EntranceEngine(id) with SingleTaskOperateSupport with SingleTaskInfoSupport {
private var engineExecutor: EsEngineExecutor = _
// ...
override def execute(executeRequest: ExecuteRequest): ExecuteResponse // ...
protected def executeLine(code: String): ExecuteResponse = this.engineExecutor.executeLine(code, storePath, s"_$codeLine")

}
  1. ElasticSearch 脚本执行
    entrance.executor 包中就是 ElasticSearch 客户端的封装、请求的封装和结果的解析等相关代码。
    ElasticSearch 客户端封装在 EsClient 中,通过 EsClientFactory 进行实例化,并将 datasourceName 作为唯一 Key 进行缓存。
    EsEngineExecutorImpl 是 EsEngineExecutor 的实现,用于任务的执行。
    ResponseHandlerImpl 用于结果的处理,会根据 ElasticSearch 的返回类型进行反序列化,并保存为 Linkis 的 ResultSet。

DataSource 路由

在与微众大佬的讨论交流中得知后面 Linkis 的架构将会引入 DataSource 的概念,DataSource 模块维护引擎的连接信息和集群等信息,可以减少一些数据源运行配置,方便数据源配置和权限管理,为数据平台提供元数据信息,并可根据 DataSource 进行路由实现多集群的路由。

在 Linkis-0.11.0版本中添加了 linkis-gateway-ujes-datasource-ruler 模块,作为一个 Gateway 插件的形式简单实现了,请求和 Entrance 的路由。

linkis-gateway-ujes-datasource-ruler 模块的实现

抽象出 EntranceGatewayRouterRuler 接口用于执行路由规则,在 Gateway 模块的 EntranceGatewayRouter 中注入 EntranceGatewayRouterRuler 实例。

1
2
3
4
5
6
7
8
9
10
11
12
13
14
15
16
17
18
19
20
21
22
@Component
class EntranceGatewayRouter extends AbstractGatewayRouter {

@Autowired(required = false)
private var rules: Array[EntranceGatewayRouterRuler] = _

override def route(gatewayContext: GatewayContext): ServiceInstance = {
gatewayContext.getGatewayRoute.getRequestURI match {
case EntranceGatewayRouter.ENTRANCE_REGEX(_) =>
// ...
serviceId.map(applicationName => {
rules match {
case array: Array[EntranceGatewayRouterRuler] => array.foreach(_.rule(applicationName, gatewayContext))
case _ =>
}
ServiceInstance(applicationName, gatewayContext.getGatewayRoute.getServiceInstance.getInstance)
}).orNull
case _ => null
}
}

}

linkis-gateway-ujes-datasource-ruler 模块,主要是做了一个 DataSource 和 Entrance Instance 的映射,并保存在 Mysql 中。DatasourceGatewayRouterRuler 实现了具体的路由策略,DatasourceMapService 接口维护 DataSource 映射。

1
2
3
4
5
6
7
8
9
10
11
12
13
14
15
16
17
18
19
20
21
22
23
24
25
26
27
28
29
30
31
32
33
34
35
36
37
38
39
40
41
42
// 维护 DataSource 映射的接口
public interface DatasourceMapService {

String getInstanceByDatasource(String datasourceName);

long countByInstance(String instance);

String insertDatasourceMap(String datasourceName, String instance, String serviceId);

}

// EntranceGatewayRouterRuler 的实现类,执行具体的路由逻辑
class DatasourceGatewayRouterRuler extends EntranceGatewayRouterRuler with Logging {

// 路由的方法
override def rule(serviceId: String, gatewayContext: GatewayContext): Unit = if(StringUtils.isNotBlank(gatewayContext.getRequest.getRequestBody)) {
// 从请求中获取 datasourceName
val datasourceName = getDatasourceName(gatewayContext.getRequest.getRequestBody)
if (StringUtils.isBlank(datasourceName)) return
debug(s"datasourceName: $datasourceName")
// 通过 datasourceName 获取映射
datasourceMapService.getInstanceByDatasource(datasourceName) match {
case i: String if StringUtils.isNotBlank(i) =>
// 存在映射直接返回 Instance
gatewayContext.getGatewayRoute.getServiceInstance.setInstance(i)
case _ => {
// 不存在映射时,先获取 Instance 列表,并根据已经存在映射的数据按照从小到大排序,获取最少映射的 Instance,插入 DataSource 映射并返回
val newInstance = ServiceInstanceUtils.getRPCServerLoader.getServiceInstances(serviceId)
.map(item => (item, datasourceMapService.countByInstance(item.getInstance)))
.sortBy(_._2).map(_._1.getInstance).headOption match {
case Some(item) => datasourceMapService.insertDatasourceMap(datasourceName, item, serviceId)
case None => null
}
debug(s"newInstance: $newInstance")
if (StringUtils.isNotBlank(newInstance)) {
gatewayContext.getGatewayRoute.getServiceInstance.setInstance(newInstance)
}
}
}
}

}

Linkis 权限系统对接

Posted on 2020-10-30

Linkis 权限控制

目前 Linkis 的库表权限控制主要是依赖于 Hive 的权限控制。

下面分享一下 Linkis 接入第三方权限系统,进行库表权限的控制。主要做了三个模块的接入:Metadata 模块、Hive 引擎、Spark 引擎。

以下代码大多为伪代码,需要根据实际情况进行完善,AuthClient 为权限系统的客户端,主要与权限系统交互,获取和校验用户的库表权限。

MetaData 模块对接

前端页面上数据开发面板中,展示的数据库和表是通过调用 linkis-metadata 模块进行获取的,当前的实现是直接查询 Hive 权限相关的表进行获取。

这里需要修改 com.webank.wedatasphere.linkis.metadata.service.impl.DataSourceServiceImpl 类,接入权限系统,根据用户获取有权限的库表。

1
2
3
4
5
6
7
8
9
10
11
12
13
14
15
16
17
18
19
20
21
22
23
24
25
26
27
28
29
30
31
AuthClient authClient = AuthClient.getInstance();
@Override
public JsonNode getDbs(String userName) throws Exception {
List<String> dbs = authClient.getDbsByUser(userName);
ArrayNode dbsNode = jsonMapper.createArrayNode();
// ...
return dbsNode;
}
@Override
public JsonNode getDbsWithTables(String userName) throws Exception {
ArrayNode dbNodes = jsonMapper.createArrayNode();
List<String> dbs = authClient.getDbsByUser(userName);
// ...
return dbNodes;
}
@Override
public JsonNode queryTables(String database, String userName) {
List<Map<String, Object>> listTables = Lists.newArrayList();
// ...
List<String> authTables = authClient.getTablesByUser(database, userName);

ArrayNode tables = jsonMapper.createArrayNode();
for (Map<String, Object> table : listTables) {
String talbeName = (String) table.get("NAME");
if (!authTables.contains(talbeName)) {
continue;
}
// ...
}
return tables;
}

Hive 引擎对接

Hive 引擎是通过 Hive Driver 进行任务的执行,那么可以通过实现 PreExecute 接口,配置到 hive.exec.pre.hooks 中,完成权限的校验,校验不通过时抛出异常进行拦截。

AuthHiveHook 为 PreExecute 的实现,具体实现如下:

1
2
3
4
5
6
7
8
9
10
11
12
13
14
15
16
17
18
19
20
21
22
class AuthHiveHook extends PreExecute {

def user: String = DWCArgumentsParser.getDWCOptionMap("user")
val authClient: AuthClient = AuthClient.getInstance()

override def run(sess: SessionState, inputs: util.Set[ReadEntity], outputs: util.Set[WriteEntity], ugi: UserGroupInformation): Unit = {
inputs.foreach(input => {
val database = input.getTable.getDbName
val table = input.getTable.getTableName
if (!authClient.checkReadTable(user, database, table)) {
throw new AuthorizationException("Authorization failed, user:" + user + " database:" + database + " table:" + table)
}
})
outputs.foreach(output => {
val database = output.getTable.getDbName
val table = output.getTable.getTableName
if (!authClient.checkWriteTable(user, database, table)) {
throw new AuthorizationException("Authorization failed, user:" + user + " database:" + database + " table:" + table)
}
})
}
}

Spark 引擎对接

Spark 引擎的库表权限控制参考了 spark-authorizer 的实现,通过实现 OptimizerRule,对 LogicalPlan 解析输入输出表,再进行权限校验和控制。

Spark 写 Parquet 数据丢失问题

Posted on 2020-10-28

问题背景

数据同步任务是为了做跨集群的 Hive 数据同步,通过 Spark 读取源集群 Hive 数据源,再写入目标集群 Table Location 的 HDFS 路径。

用户批量执行 Spark 同步任务时(写同一个表的不同分区,大多是为了补历史数据的任务),部分分区数据丢失。

问题定位

通过 Spark sql 对比,源集群和目标集群的数据,发现部分分区确实存在数据丢失。
查询目标集群丢失数据分区的 HDFS 目录,发现确实缺少部分 parquet 文件(parquet 文件缺少部分序列)。
查看 NameNode 日志,发现 Parquet 文件是先写到 ${TableLocation}/_temporary 目录中,在 rename 到目标目录。
继续在 NameNode 日志中查找丢失目录的 temp 文件,发现只有 Create 操作,没有 Delete 操作,不过发现了多个客户端在写同一个 _temporary 目录,并有删除操作。

临时路径如何确定

Spark 写文件的入口类为:org.apache.spark.sql.execution.datasources.FileFormatWriter

org.apache.hadoop.mapreduce.lib.output.FileOutputCommitter 类是用来定义 MapReduce 任务 Job 的输出,包括 Job Task 输出路径的初始化、清理等工作。其中定义了temp 目录为 ${RealOutput}/_temporary 。

Spark 任务为 FileOutputCommitter 做了一层代理 org.apache.spark.internal.io.FileCommitProtocol,部分场景使用到了 stagingDir 作为 output 路径。

org.apache.spark.internal.io.HadoopMapReduceCommitProtocol#newTaskTempFile,当 dynamicPartitionOverwrite 为 true 时,临时路径在 spark stagingDir 中则每个任务不会重复。

Spark 通过 Hive 写入是如何保证的

Spark 中保存 Hive 表数据,实际上写入的路径改成了 hive staging 的路径,具体代码:org.apache.spark.sql.hive.execution.SaveAsHiveFile#getExternalTmpPath 中,然后进行 load partition。这个相当于直接将写入的 basePath 路径改变了,所以不会存在冲突。

解决方法

方法一(没有采用): 将 saveMode 设置为 Overwrite,partitionOverwriteMode 设置为 dynamic,这样写入的temp 目录就在 stagingDir 中,不过 overwrite 模式写入会先清空目标分区,所以没有采用。

1
2
3
4
resultDF.write.partitionBy(partitionColumn: _*)
.mode("overwrite")
.option("partitionOverwriteMode", "dynamic")
.parquet(hdfsTablePath)

方法二:定义 Temp 目录为 ${TableLocation}/${JobId},确保写入路径不重复,在将 Temp 目录 merge 到 target 路径中。

1
2
3
4
5
resultDF.write.partitionBy(partitionColumn: _*).mode(writeMode)
.parquet(tempDir)
// merge temp dir to table path
// merge 方法参考 org.apache.hadoop.mapreduce.lib.output.FileOutputCommitter#mergePaths
mergePaths(tempDir, hdfsTablePath)

其他

写入对象存储的性能调优,也与 FileOutputCommitter 这块有关。参考: 存算分离下写性能提升10倍以上,EMR Spark引擎是如何做到的?

《SQL解析》 一、解析器简介

Posted on 2020-09-30

SQL解析系列

Posted on 2020-09-18

SQL解析

编译器简介

Antlr4、JavaCC – Parser

Apache Calcite、Spark Catalyst – (Parser&Optimizer)

HIVE SQL、Spark SQL 执行过程

Spark HiveMetastoreCatalog Infer Schema

Posted on 2020-09-17

Spark HiveMetastoreCatalog Infer Schema

问题一

说明

报错显示读取 Parquet footer 错误,不过所读取的文件不是查询条件指定的分区。

1
2
3
4
5
6
7
8
9
10
11
12
13
14
15
16
17
18
19
20
21
22
23
24
25
26
27
28
29
30
31
32
33
34
35
Driver stacktrace:
at org.apache.spark.scheduler.DAGScheduler.org$apache$spark$scheduler$DAGScheduler$$failJobAndIndependentStages(DAGScheduler.scala:1889)
......
at org.apache.spark.sql.execution.datasources.parquet.ParquetFileFormat$.mergeSchemasInParallel(ParquetFileFormat.scala:633)
at org.apache.spark.sql.execution.datasources.parquet.ParquetFileFormat.inferSchema(ParquetFileFormat.scala:241)
at org.apache.spark.sql.hive.HiveMetastoreCatalog.org$apache$spark$sql$hive$HiveMetastoreCatalog$$inferIfNeeded(HiveMetastoreCatalog.scala:239)
at org.apache.spark.sql.hive.HiveMetastoreCatalog$$anonfun$4$$anonfun$5.apply(HiveMetastoreCatalog.scala:167)
at org.apache.spark.sql.hive.HiveMetastoreCatalog$$anonfun$4$$anonfun$5.apply(HiveMetastoreCatalog.scala:156)
at scala.Option.getOrElse(Option.scala:121)
at org.apache.spark.sql.hive.HiveMetastoreCatalog$$anonfun$4.apply(HiveMetastoreCatalog.scala:156)
at org.apache.spark.sql.hive.HiveMetastoreCatalog$$anonfun$4.apply(HiveMetastoreCatalog.scala:148)
at org.apache.spark.sql.hive.HiveMetastoreCatalog.withTableCreationLock(HiveMetastoreCatalog.scala:54)
at org.apache.spark.sql.hive.HiveMetastoreCatalog.convertToLogicalRelation(HiveMetastoreCatalog.scala:148)
at org.apache.spark.sql.hive.RelationConversions.org$apache$spark$sql$hive$RelationConversions$$convert(HiveStrategies.scala:207)
at org.apache.spark.sql.hive.RelationConversions$$anonfun$apply$4.applyOrElse(HiveStrategies.scala:239)
at org.apache.spark.sql.hive.RelationConversions$$anonfun$apply$4.applyOrElse(HiveStrategies.scala:228)
at ......
Caused by: org.apache.spark.SparkException: Exception thrown in awaitResult:
at org.apache.spark.util.ThreadUtils$.awaitResult(ThreadUtils.scala:226)
at org.apache.spark.util.ThreadUtils$.parmap(ThreadUtils.scala:290)
at org.apache.spark.sql.execution.datasources.parquet.ParquetFileFormat$.readParquetFootersInParallel(ParquetFileFormat.scala:538)
at org.apache.spark.sql.execution.datasources.parquet.ParquetFileFormat$$anonfun$9.apply(ParquetFileFormat.scala:611)
at org.apache.spark.sql.execution.datasources.parquet.ParquetFileFormat$$anonfun$9.apply(ParquetFileFormat.scala:603)
at ......
Caused by: java.io.IOException: Could not read footer for file: FileStatus{path=hdfs://hadoop-bdwg-ns01/hive/warehouse/cupid_bi.db/report_qixiao_tracking_event_count_daily/dt=2016-05-24/000000_0.gz; isDirectory=false; length=1191537; replication=0; blocksize=0; modification_time=0; access_time=0; owner=; group=; permission=rw-rw-rw-; isSymlink=false}
at org.apache.spark.sql.execution.datasources.parquet.ParquetFileFormat$$anonfun$readParquetFootersInParallel$1.apply(ParquetFileFormat.scala:551)
at org.apache.spark.sql.execution.datasources.parquet.ParquetFileFormat$$anonfun$readParquetFootersInParallel$1.apply(ParquetFileFormat.scala:538)
at ......
Caused by: java.lang.RuntimeException: hdfs://hadoop-bdwg-ns01/hive/warehouse/cupid_bi.db/report_qixiao_tracking_event_count_daily/dt=2016-05-24/000000_0.gz is not a Parquet file. expected magic number at tail [80, 65, 82, 49] but found [78, 59, 23, 1]
at org.apache.parquet.hadoop.ParquetFileReader.readFooter(ParquetFileReader.java:524)
at org.apache.parquet.hadoop.ParquetFileReader.readFooter(ParquetFileReader.java:505)
at org.apache.parquet.hadoop.ParquetFileReader.readFooter(ParquetFileReader.java:499)
at org.apache.parquet.hadoop.ParquetFileReader.readFooter(ParquetFileReader.java:476)
at org.apache.spark.sql.execution.datasources.parquet.ParquetFileFormat$$anonfun$readParquetFootersInParallel$1.apply(ParquetFileFormat.scala:544)
... 9 more

排查

关键信息:

1
2
org.apache.spark.sql.execution.datasources.parquet.ParquetFileFormat.inferSchema(ParquetFileFormat.scala:241)
org.apache.spark.sql.hive.HiveMetastoreCatalog.org$apache$spark$sql$hive$HiveMetastoreCatalog$$inferIfNeeded(HiveMetastoreCatalog.scala:239)

通过对错误栈进行代码分析,锁定 ParquetFileFormat.inferSchema 和 HiveMetastoreCatalog.inferIfNeeded 两个方法。发现错误是发生在 Parquet 文件的 Schema 推断中。

问题二

说明

Driver 连接不上,像是卡住了,然后就直接退出,查询Application日志没有错误日志,查看Executor 的日志显示 java.io.IOException: Connection reset by peer

1
Application application_1574672087080_11986014 failed 1 times due to ApplicationMaster for attempt appattempt_1574672087080_11986014_000001 timed out. Failing the application.

排查

这个错误没有什么关键的错误信息,一般看到 Connection reset by peer(连接被重置)错误和 timed out 错误,想到调整超时时间,设置参数: spark.network.timeout=1200s,不过发现并没有用,还没有达到此时间就报错了。

查看 ApplicationMaster 所在的机器,对 ApplicationMaster(Driver) 的线程栈进行分析,jstack 打印线程栈信息,发现关键信息如下:

1
2
3
4
5
6
7
8
9
10
11
12
13
14
15
16
17
18
19
20
21
22
23
24
25
26
27
28
29
30
31
32
33
34
35
36
37
38
39
40
41
42
"Driver" #38 prio=5 os_prio=0 tid=0x00002b504f82a000 nid=0x78b0 runnable [0x00002b50809a9000]
java.lang.Thread.State: RUNNABLE
at java.lang.String.indexOf(String.java:1769)
at java.lang.String.indexOf(String.java:1718)
at org.apache.commons.lang.StringUtils.replace(StringUtils.java:3807)
at org.apache.commons.lang.StringUtils.replace(StringUtils.java:3771)
at org.apache.hadoop.fs.Path.normalizePath(Path.java:240)
at org.apache.hadoop.fs.Path.initialize(Path.java:203)
at org.apache.hadoop.fs.Path.<init>(Path.java:172)
at org.apache.spark.sql.execution.datasources.InMemoryFileIndex$$anonfun$bulkListLeafFiles$3$$anonfun$7.apply(InMemoryFileIndex.scala:251)
at org.apache.spark.sql.execution.datasources.InMemoryFileIndex$$anonfun$bulkListLeafFiles$3$$anonfun$7.apply(InMemoryFileIndex.scala:244)
at scala.collection.TraversableLike$$anonfun$map$1.apply(TraversableLike.scala:234)
at scala.collection.mutable.ResizableArray$class.foreach(ResizableArray.scala:59)
at scala.collection.mutable.ArrayBuffer.foreach(ArrayBuffer.scala:48)
at scala.collection.TraversableLike$class.map(TraversableLike.scala:234)
at scala.collection.AbstractTraversable.map(Traversable.scala:104)
at org.apache.spark.sql.execution.datasources.InMemoryFileIndex$$anonfun$bulkListLeafFiles$3.apply(InMemoryFileIndex.scala:244)
at org.apache.spark.sql.execution.datasources.InMemoryFileIndex$$anonfun$bulkListLeafFiles$3.apply(InMemoryFileIndex.scala:243)
at scala.collection.TraversableLike$$anonfun$map$1.apply(TraversableLike.scala:234)
at scala.collection.IndexedSeqOptimized$class.foreach(IndexedSeqOptimized.scala:33)
at scala.collection.mutable.ArrayOps$ofRef.foreach(ArrayOps.scala:186)
at scala.collection.TraversableLike$class.map(TraversableLike.scala:234)
at scala.collection.mutable.ArrayOps$ofRef.map(ArrayOps.scala:186)
at org.apache.spark.sql.execution.datasources.InMemoryFileIndex$.bulkListLeafFiles(InMemoryFileIndex.scala:243)
at org.apache.spark.sql.execution.datasources.InMemoryFileIndex.listLeafFiles(InMemoryFileIndex.scala:126)
at org.apache.spark.sql.execution.datasources.InMemoryFileIndex.refresh0(InMemoryFileIndex.scala:91)
at org.apache.spark.sql.execution.datasources.InMemoryFileIndex.<init>(InMemoryFileIndex.scala:67)
at org.apache.spark.sql.execution.datasources.PrunedInMemoryFileIndex.<init>(CatalogFileIndex.scala:118)
at org.apache.spark.sql.execution.datasources.CatalogFileIndex.filterPartitions(CatalogFileIndex.scala:84)
at org.apache.spark.sql.execution.datasources.CatalogFileIndex.listFiles(CatalogFileIndex.scala:59)
at org.apache.spark.sql.hive.HiveMetastoreCatalog.org$apache$spark$sql$hive$HiveMetastoreCatalog$$inferIfNeeded(HiveMetastoreCatalog.scala:242)
at org.apache.spark.sql.hive.HiveMetastoreCatalog$$anonfun$4$$anonfun$5.apply(HiveMetastoreCatalog.scala:167)
at org.apache.spark.sql.hive.HiveMetastoreCatalog$$anonfun$4$$anonfun$5.apply(HiveMetastoreCatalog.scala:156)
at scala.Option.getOrElse(Option.scala:121)
at org.apache.spark.sql.hive.HiveMetastoreCatalog$$anonfun$4.apply(HiveMetastoreCatalog.scala:156)
at org.apache.spark.sql.hive.HiveMetastoreCatalog$$anonfun$4.apply(HiveMetastoreCatalog.scala:148)
at org.apache.spark.sql.hive.HiveMetastoreCatalog.withTableCreationLock(HiveMetastoreCatalog.scala:54)
at org.apache.spark.sql.hive.HiveMetastoreCatalog.convertToLogicalRelation(HiveMetastoreCatalog.scala:148)
at org.apache.spark.sql.hive.RelationConversions.org$apache$spark$sql$hive$RelationConversions$$convert(HiveStrategies.scala:207)
at ......

根据问题一中的经验,查询 InMemoryFileIndex 日志,发现 InMemoryFileIndex 扫描两万多目录。

1
InMemoryFileIndex: Listing leaf files and directories in parallel under: hdfs://.....

问题解决

查看 org.apache.spark.sql.hive.HiveMetastoreCatalog#inferIfNeeded 代码如下:

1
2
3
4
5
6
7
8
9
10
11
12
13
14
15
16
17
18
19
20
21
22
23
24
25
26
27
28
29
30
31
32
33
34
35
36
37
38
39
private def inferIfNeeded(
relation: HiveTableRelation,
options: Map[String, String],
fileFormat: FileFormat,
fileIndexOpt: Option[FileIndex] = None): CatalogTable = {
val inferenceMode = sparkSession.sessionState.conf.caseSensitiveInferenceMode
val shouldInfer = (inferenceMode != NEVER_INFER) && !relation.tableMeta.schemaPreservesCase
val tableName = relation.tableMeta.identifier.unquotedString
if (shouldInfer) {
logInfo(s"Inferring case-sensitive schema for table $tableName (inference mode: " +
s"$inferenceMode)")
val fileIndex = fileIndexOpt.getOrElse {
val rootPath = new Path(relation.tableMeta.location)
new InMemoryFileIndex(sparkSession, Seq(rootPath), options, None)
}

val inferredSchema = fileFormat
.inferSchema(
sparkSession,
options,
fileIndex.listFiles(Nil, Nil).flatMap(_.files))
.map(mergeWithMetastoreSchema(relation.tableMeta.dataSchema, _))

inferredSchema match {
case Some(dataSchema) =>
if (inferenceMode == INFER_AND_SAVE) {
updateDataSchema(relation.tableMeta.identifier, dataSchema)
}
val newSchema = StructType(dataSchema ++ relation.tableMeta.partitionSchema)
relation.tableMeta.copy(schema = newSchema)
case None =>
logWarning(s"Unable to infer schema for table $tableName from file format " +
s"$fileFormat (inference mode: $inferenceMode). Using metastore schema.")
relation.tableMeta
}
} else {
relation.tableMeta
}
}

shouldInfer 变量为 true 时会进行 Schema 推断,那么如何设置让它不进行推断呢?有下面两种情况:

  1. 设置 spark.sql.hive.caseSensitiveInferenceMode=NEVER_INFER
  2. schemaPreservesCase 为 true 时也跳过 infer schema,需要 Hive 表有 spark.sql.sources.schema.* 相关配置,并且 schema 和 table.schema 相等(相关判断在org.apache.spark.sql.hive.HiveExternalCatalog#restoreHiveSerdeTable里面)。

后面选择设置 spark.sql.hive.caseSensitiveInferenceMode=NEVER_INFER,关闭 Schema 推断解决问题。在 Spark3.0 中已经将此配置默认设置为 NEVER_INFER。

相关说明

  1. 为何有 Schema 推断
    由于 Hive Schema 是不区分大小写,Parquet 文件的 Schema 是区分大小写的,读取有大小名称的 Parquet 文件时可能会导致结果有问题。

  2. caseSensitiveInferenceMode 的三种模式说明
    caseSensitiveInferenceMode 有三种模式
    INFER_AND_SAVE:此模式会在第一次进行Schema推断,然后保持到Hive表的properties里面(spark.sql.sources.schema.*)。
    INFER_ONLY:进行推断,不会保持
    NEVER_INFER:不进行推断

Apache Atlas 元数据管理

Posted on 2020-06-08

Apache Atlas 元数据管理

官网地址: http://atlas.apache.org/

Apache Atlas 是开源的Hadoop体系的元数据管理和数据治理工具。此次探索主要进行 Apache Atlas 的安装,收集 Hive 元数据和 Spark 元数据。

安装

参考:配置、源码构建安装

说明:

  • Atlas 2.0.0 版本,依赖 HBase 2.0,由于测试集群 HBase 是 1.2 ,所以重新选择 Atlas 1.2.0 的包
  • Graph Search Index 选择的是 ElasticSearch,官方包中 atlas.graph.index.search.hostname 配置名称错误需要注意。
  • Kafka、Zookeeper 都是另外安装的,需要注释掉 atlas.notification.embedded 和 atlas.kafka.data 配置

完整配置(atlas-application.properties ):附录1

用户配置:conf/users-credentials.properties

支持 Hive

Atlas Hive hook,通过监听 Hive 的一些操作,生成元数据发送到 Kakfa。

安装使用 Hive Hook

  1. 修改 hive-site.xml

    1
    2
    3
    4
    <property>
    <name>hive.exec.post.hooks</name>
    <value>org.apache.atlas.hive.hook.HiveHook</value>
    </property>
  2. 添加 Atlas Hive hook 的依赖包
    复制 ${ATLAS_HOME}/hook/hive 里面的依赖包到 ${HIVE_HOME}/auxlib 中,复制${ATLAS_HOME}/conf/atlas-application.properties 到 ${HIVE_CONF_DIR} 中

验证 Hive Hook

执行下面语句:

1
2
create table wangz_test004 as select * from wangz_test
insert into wangz_test004 select name01,age01,null from wangz_test001

可以看到操作、数据库、表和字段的一些元数据,血缘关系如下:

支持 Spark

使用开源的 spark-atlas-connector ,在使用过程中发现 spark sql 操作 hive 表时,无法生成 Lineage 信息,我做了一些修改 wForget/spark-atlas-connector/tree/dev

安装使用 spark-atlas-connector

下载源码 wForget/spark-atlas-connector/tree/dev ,进行打包 (mvn clean -DskipTests package)。
复制 1100-spark_model.json 文件到 ${ATLAS_HOME}/models/1000-Hadoop目录下,重启 Atlas。
复制 atlas-application.properties 配置文件到 ${SPARK_HOME}/conf 下面。
执行下面语句启动 spark shell(也可以直接配置到spark 默认配置中)

1
2
3
4
5
spark-shell \
--jars ${ATLAS_HOME}/hook/spark/spark-atlas-connector-assembly-0.1.0-SNAPSHOT.jar \
--conf spark.extraListeners=com.hortonworks.spark.atlas.SparkAtlasEventTracker \
--conf spark.sql.queryExecutionListeners=com.hortonworks.spark.atlas.SparkAtlasEventTracker \
--conf spark.sql.streaming.streamingQueryListeners=com.hortonworks.spark.atlas.SparkAtlasStreamingQueryEventTracker

验证 spark-atlas-connector

执行下面语句:

1
2
spark.sql("create table test.wangz_test012 as select * from test.wangz_test").show()
spark.sql("insert into test.wangz_test012 select name01,age01,null from test.wangz_test001").show()

可以看到操作、数据库、表和字段的一些元数据,血缘关系如下:

TODO

  • Spark Sql 操作 Hive Table 时,经过对 spark-atlas-connector 简单的修改,是可以看到血缘关系,不过 table db 等类型还是 spark 类型,需要转换成 hive 类型。(已经完成,参考:wForget/spark-atlas-connector/tree/dev-hive )

附录1

1
2
3
4
5
6
7
8
9
10
11
12
13
14
15
16
17
18
19
20
21
22
23
24
25
26
27
28
29
30
31
32
33
34
35
36
37
38
39
40
41
42
43
44
45
46
47
48
49
50
51
52
53
54
55
56
57
58
59
60
61
62
63
64
65
66
67
68
69
70
71
72
73
74
75
76
77
78
79
80
81
82
83
84
85
86
87
88
89
90
91
92
93
94
95
96
97
98
99
100
101
102
103
104
105
106
107
108
109
110
111
112
113
114
115
116
117
118
119
120
121
122
123
124
125
126
127
128
129
130
131
132
133
134
135
136
137
138
139
140
141
142
143
144
145
146
147
148
149
150
151
152
153
154
155
156
157
158
159
160
161
162
163
164
165
166
167
168
169
170
171
172
173
174
175
176
177
178
179
180
181
182
183
184
185
186
187
188
189
190
191
192
193
194
195
196
197
198
199
200
201
202
203
204
205
206
207
208
209
210
211
212
213
214
215
216
217
218
219
220
221
222
223
224
225
226
227
228
229
230
231
232
233
234
235
236
237
238
239
240
241
242
243
244
245
246
247
248
249
250
251
252
253
254
255
256
257
258
259
260
261
262
263
264
265
266
267
268
269
270
271
272
273
274
275
276
277
278
279
280
281
282
283
284
285
286
287
#########  Graph Database Configs  #########

# Graph Database

#Configures the graph database to use. Defaults to JanusGraph
#atlas.graphdb.backend=org.apache.atlas.repository.graphdb.janus.AtlasJanusGraphDatabase

# Graph Storage
# Set atlas.graph.storage.backend to the correct value for your desired storage
# backend. Possible values:
#
# hbase
# cassandra
# embeddedcassandra - Should only be set by building Atlas with -Pdist,embedded-cassandra-solr
# berkeleyje
#
# See the configuration documentation for more information about configuring the various storage backends.
#
atlas.graph.storage.backend=hbase
atlas.graph.storage.hbase.table=apache_atlas_janus

#Hbase
#For standalone mode , specify localhost
#for distributed mode, specify zookeeper quorum here
atlas.graph.storage.hostname=10.6.160.***,10.6.160.***,10.6.160.***
atlas.graph.storage.hbase.regions-per-server=1
atlas.graph.storage.lock.wait-time=10000

#In order to use Cassandra as a backend, comment out the hbase specific properties above, and uncomment the
#the following properties
#atlas.graph.storage.clustername=
#atlas.graph.storage.port=

# Gremlin Query Optimizer
#
# Enables rewriting gremlin queries to maximize performance. This flag is provided as
# a possible way to work around any defects that are found in the optimizer until they
# are resolved.
#atlas.query.gremlinOptimizerEnabled=true

# Delete handler
#
# This allows the default behavior of doing "soft" deletes to be changed.
#
# Allowed Values:
# org.apache.atlas.repository.store.graph.v1.SoftDeleteHandlerV1 - all deletes are "soft" deletes
# org.apache.atlas.repository.store.graph.v1.HardDeleteHandlerV1 - all deletes are "hard" deletes
#
#atlas.DeleteHandlerV1.impl=org.apache.atlas.repository.store.graph.v1.SoftDeleteHandlerV1

# Entity audit repository
#
# This allows the default behavior of logging entity changes to hbase to be changed.
#
# Allowed Values:
# org.apache.atlas.repository.audit.HBaseBasedAuditRepository - log entity changes to hbase
# org.apache.atlas.repository.audit.CassandraBasedAuditRepository - log entity changes to cassandra
# org.apache.atlas.repository.audit.NoopEntityAuditRepository - disable the audit repository
#
atlas.EntityAuditRepository.impl=org.apache.atlas.repository.audit.HBaseBasedAuditRepository

# if Cassandra is used as a backend for audit from the above property, uncomment and set the following
# properties appropriately. If using the embedded cassandra profile, these properties can remain
# commented out.
# atlas.EntityAuditRepository.keyspace=atlas_audit
# atlas.EntityAuditRepository.replicationFactor=1


# Graph Search Index
#atlas.graph.index.search.backend=solr
atlas.graph.index.search.backend=elasticsearch

#Solr
#Solr cloud mode properties
#atlas.graph.index.search.solr.mode=cloud
#atlas.graph.index.search.solr.zookeeper-url=
#atlas.graph.index.search.solr.zookeeper-connect-timeout=60000
#atlas.graph.index.search.solr.zookeeper-session-timeout=60000
#atlas.graph.index.search.solr.wait-searcher=true

#Solr http mode properties
#atlas.graph.index.search.solr.mode=http
#atlas.graph.index.search.solr.http-urls=http://localhost:8983/solr

# ElasticSearch support (Tech Preview)
# Comment out above solr configuration, and uncomment the following two lines. Additionally, make sure the
# hostname field is set to a comma delimited set of elasticsearch master nodes, or an ELB that fronts the masters.
#
# Elasticsearch does not provide authentication out of the box, but does provide an option with the X-Pack product
# https://www.elastic.co/products/x-pack/security
#
# Alternatively, the JanusGraph documentation provides some tips on how to secure Elasticsearch without additional
# plugins: https://docs.janusgraph.org/latest/elasticsearch.html
#atlas.graph.index.search.hostname=10.18.40.230:9200
atlas.graph.index.search.hostname=10.**.**.**:9200,10.**.**.**:9200,10.**.**.**:9200
atlas.graph.index.search.elasticsearch.client-only=true

# Solr-specific configuration property
atlas.graph.index.search.max-result-set-size=150

######### Notification Configs #########
#atlas.notification.embedded=true
atlas.notification.embedded=false
#atlas.kafka.data=${sys:atlas.home}/data/kafka
atlas.kafka.zookeeper.connect=localhost:12181
atlas.kafka.bootstrap.servers=localhost:9092
atlas.kafka.zookeeper.session.timeout.ms=400
atlas.kafka.zookeeper.connection.timeout.ms=200
atlas.kafka.zookeeper.sync.time.ms=20
atlas.kafka.auto.commit.interval.ms=1000
atlas.kafka.hook.group.id=atlas

atlas.kafka.enable.auto.commit=false
atlas.kafka.auto.offset.reset=earliest
atlas.kafka.session.timeout.ms=30000
atlas.kafka.offsets.topic.replication.factor=1
atlas.kafka.poll.timeout.ms=1000

atlas.notification.create.topics=true
atlas.notification.replicas=1
atlas.notification.topics=ATLAS_HOOK,ATLAS_ENTITIES
atlas.notification.log.failed.messages=true
atlas.notification.consumer.retry.interval=500
atlas.notification.hook.retry.interval=1000
# Enable for Kerberized Kafka clusters
#atlas.notification.kafka.service.principal=kafka/_HOST@EXAMPLE.COM
#atlas.notification.kafka.keytab.location=/etc/security/keytabs/kafka.service.keytab

## Server port configuration
atlas.server.http.port=21001
#atlas.server.https.port=21443

######### Security Properties #########

# SSL config
atlas.enableTLS=false

#truststore.file=/path/to/truststore.jks
#cert.stores.credential.provider.path=jceks://file/path/to/credentialstore.jceks

#following only required for 2-way SSL
#keystore.file=/path/to/keystore.jks

# Authentication config

atlas.authentication.method.kerberos=false
atlas.authentication.method.file=true

#### ldap.type= LDAP or AD
atlas.authentication.method.ldap.type=none

#### user credentials file
atlas.authentication.method.file.filename=${sys:atlas.home}/conf/users-credentials.properties

### groups from UGI
#atlas.authentication.method.ldap.ugi-groups=true

######## LDAP properties #########
#atlas.authentication.method.ldap.url=ldap://<ldap server url>:389
#atlas.authentication.method.ldap.userDNpattern=uid={0},ou=People,dc=example,dc=com
#atlas.authentication.method.ldap.groupSearchBase=dc=example,dc=com
#atlas.authentication.method.ldap.groupSearchFilter=(member=uid={0},ou=Users,dc=example,dc=com)
#atlas.authentication.method.ldap.groupRoleAttribute=cn
#atlas.authentication.method.ldap.base.dn=dc=example,dc=com
#atlas.authentication.method.ldap.bind.dn=cn=Manager,dc=example,dc=com
#atlas.authentication.method.ldap.bind.password=<password>
#atlas.authentication.method.ldap.referral=ignore
#atlas.authentication.method.ldap.user.searchfilter=(uid={0})
#atlas.authentication.method.ldap.default.role=<default role>


######### Active directory properties #######
#atlas.authentication.method.ldap.ad.domain=example.com
#atlas.authentication.method.ldap.ad.url=ldap://<AD server url>:389
#atlas.authentication.method.ldap.ad.base.dn=(sAMAccountName={0})
#atlas.authentication.method.ldap.ad.bind.dn=CN=team,CN=Users,DC=example,DC=com
#atlas.authentication.method.ldap.ad.bind.password=<password>
#atlas.authentication.method.ldap.ad.referral=ignore
#atlas.authentication.method.ldap.ad.user.searchfilter=(sAMAccountName={0})
#atlas.authentication.method.ldap.ad.default.role=<default role>

######### JAAS Configuration ########

#atlas.jaas.KafkaClient.loginModuleName = com.sun.security.auth.module.Krb5LoginModule
#atlas.jaas.KafkaClient.loginModuleControlFlag = required
#atlas.jaas.KafkaClient.option.useKeyTab = true
#atlas.jaas.KafkaClient.option.storeKey = true
#atlas.jaas.KafkaClient.option.serviceName = kafka
#atlas.jaas.KafkaClient.option.keyTab = /etc/security/keytabs/atlas.service.keytab
#atlas.jaas.KafkaClient.option.principal = atlas/_HOST@EXAMPLE.COM

######### Server Properties #########
atlas.rest.address=http://localhost:21001
# If enabled and set to true, this will run setup steps when the server starts
#atlas.server.run.setup.on.start=false

######### Entity Audit Configs #########
atlas.audit.hbase.tablename=apache_atlas_entity_audit
atlas.audit.zookeeper.session.timeout.ms=1000
atlas.audit.hbase.zookeeper.quorum=10.6.160.***,10.6.160.***,10.6.160.***

######### High Availability Configuration ########
atlas.server.ha.enabled=false
#### Enabled the configs below as per need if HA is enabled #####
#atlas.server.ids=id1
#atlas.server.address.id1=localhost:21000
#atlas.server.ha.zookeeper.connect=localhost:2181
#atlas.server.ha.zookeeper.retry.sleeptime.ms=1000
#atlas.server.ha.zookeeper.num.retries=3
#atlas.server.ha.zookeeper.session.timeout.ms=20000
## if ACLs need to be set on the created nodes, uncomment these lines and set the values ##
#atlas.server.ha.zookeeper.acl=<scheme>:<id>
#atlas.server.ha.zookeeper.auth=<scheme>:<authinfo>


######### Atlas Authorization #########
atlas.authorizer.impl=simple
atlas.authorizer.simple.authz.policy.file=atlas-simple-authz-policy.json

######### Type Cache Implementation ########
# A type cache class which implements
# org.apache.atlas.typesystem.types.cache.TypeCache.
# The default implementation is org.apache.atlas.typesystem.types.cache.DefaultTypeCache which is a local in-memory type cache.
#atlas.TypeCache.impl=

######### Performance Configs #########
#atlas.graph.storage.lock.retries=10
#atlas.graph.storage.cache.db-cache-time=120000

######### CSRF Configs #########
atlas.rest-csrf.enabled=true
atlas.rest-csrf.browser-useragents-regex=^Mozilla.*,^Opera.*,^Chrome.*
atlas.rest-csrf.methods-to-ignore=GET,OPTIONS,HEAD,TRACE
atlas.rest-csrf.custom-header=X-XSRF-HEADER

############ KNOX Configs ################
#atlas.sso.knox.browser.useragent=Mozilla,Chrome,Opera
#atlas.sso.knox.enabled=true
#atlas.sso.knox.providerurl=https://<knox gateway ip>:8443/gateway/knoxsso/api/v1/websso
#atlas.sso.knox.publicKey=

############ Atlas Metric/Stats configs ################
# Format: atlas.metric.query.<key>.<name>
atlas.metric.query.cache.ttlInSecs=900
#atlas.metric.query.general.typeCount=
#atlas.metric.query.general.typeUnusedCount=
#atlas.metric.query.general.entityCount=
#atlas.metric.query.general.tagCount=
#atlas.metric.query.general.entityDeleted=
#
#atlas.metric.query.entity.typeEntities=
#atlas.metric.query.entity.entityTagged=
#
#atlas.metric.query.tags.entityTags=

######### Compiled Query Cache Configuration #########

# The size of the compiled query cache. Older queries will be evicted from the cache
# when we reach the capacity.

#atlas.CompiledQueryCache.capacity=1000

# Allows notifications when items are evicted from the compiled query
# cache because it has become full. A warning will be issued when
# the specified number of evictions have occurred. If the eviction
# warning threshold <= 0, no eviction warnings will be issued.

#atlas.CompiledQueryCache.evictionWarningThrottle=0


######### Full Text Search Configuration #########

#Set to false to disable full text search.
#atlas.search.fulltext.enable=true

######### Gremlin Search Configuration #########

#Set to false to disable gremlin search.
atlas.search.gremlin.enable=false


########## Add http headers ###########

#atlas.headers.Access-Control-Allow-Origin=*
#atlas.headers.Access-Control-Allow-Methods=GET,OPTIONS,HEAD,PUT,POST
#atlas.headers.<headerName>=<headerValue>

调度系统工作流(DAG)

Posted on 2020-05-12

调度系统工作流(DAG)

DAG是有向无环图的意思,调度系统中工作流就是以DAG的方式组织Task的依赖关系。

公司自研调度系统工作流

相关概念

  1. Job
    定义执行的任务和调度策略。
  2. DAG
    组织 Job 之间的依赖关系。
  3. Task
    系统根据 Job 调度策略生成的执行任务。

调度过程

  1. 创建 Job (根据需要创建 DAG)
  2. JobManager 根据 Job 的调度策略定时创建 Task,没有依赖的 Job 的 Task 直接标记为准备执行状态,有依赖的 Job 的 Task 标记为初始化的状态(父任务执行完成后触发状态修改)。
  3. 任务调度器获取准备执行状态的 Task,根据一些权限资源的限制和 Workers 的状态给 Task 分配最合适的 Worker,并将任务下发到 WorkerManager。
  4. WorkerManager 接收到任务下发的请求,再将任务发送到指定的 Worker。
  5. Worker 接收任务并执行,执行完成后向上回馈状态。
  6. JobManager 接收到 Task 执行的回馈,触发子 Job 对应时间节点的 Task 状态修改。

Dolphin Scheduler 工作流

相关概念

  1. 流程定义
    以拖拽的方式组织任务节点间的依赖,形成可视化的 DAG。
  2. 流程实例
    流程实例是流程定义的实例化,通过定时调度或者手动调度可以对流程进行实例化并生成流程实例。
  3. 任务实例
    任务实例是流程定义中的任务节点的实例,关联着一个流程实例,是具体执行的最小单位。
  4. 调度方式
    调度方式包括定时调度和手动调度。定时调度是系统采用 Quartz 调度器根据配置的 Cron 策略定时生成流程实例的过程。手动调度是用户手动触发一次流程实例化的过程。

调度过程

  1. 定义流程
  2. 配置调度方式
  3. 系统根据调度的方式生成流程实例
  4. Master 抽取需要执行的流程实例,并根据任务的依赖关系,生成一系列的任务实例,并放入任务的队列中(Master 会等待整个流程实例执行完成,根据依赖任务的执行状态,来控制任务实例的生成)。
  5. Worker 节点根据自身的运行情况,去任务队列中获取需要执行的任务实例并运行。

Hive SQL的编译过程

Posted on 2019-12-12
<i class="fa fa-angle-left"></i>123…5<i class="fa fa-angle-right"></i>

45 posts
28 tags
GitHub
© 2022 wangz